What Number Ink Cartridge for Hp 2540
Z7_3054ICK0KGTE30AQO5O3KA30N0
hp-concentra-wrapper-portlet
![]() Actions
Actions
HP Deskjet 2540, Ink Advantage 2545 Printers - Blinking Lights
This document is for HP Deskjet 2540, 2541, 2542, 2543, 2544, 2546, 2546B, 2546P, 2546R, 2547, 2548, 2549, and Ink Advantage 2545, 2546, and 2548 All-in-One printers.
The following sections describe the most common combinations of blinking (flashing) lights displayed on the control panel, followed by solutions for each combination. Find the blinking lights pattern you are experiencing, and then follow the steps to resolve the issue.
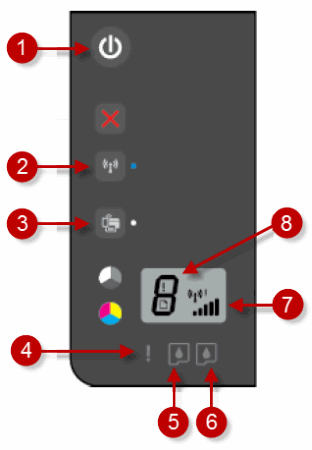
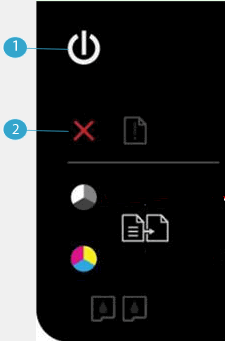
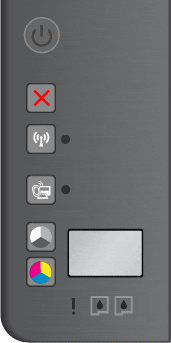
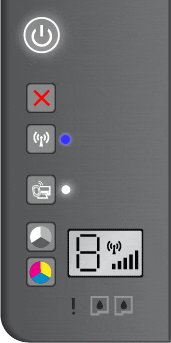
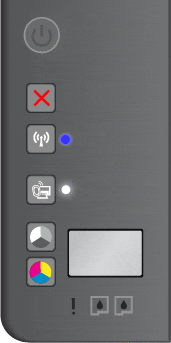
Power button Wireless status light Wireless Direct status light Attention light Tri-color cartridge light Black cartridge light Wireless Strength indicator Number of Copies display and Media Error indicator
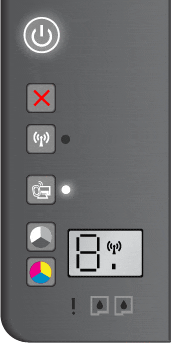
Issue: The Wireless status light blinks slowly and the Wireless Strength indicator is cycling through the signal bars
In this normal condition, the following control panel light pattern displays:
-
Power light: On
-
Wireless status light: Blinking slowly
-
Wireless Direct status light: On or off
-
Attention light: Off
-
Tri-color ink cartridge light: Off
-
Black ink cartridge light: Off
-
Wireless Strength indicator: Cycling through the signal bars
-
Number of Copies display: On
-
Media Error indicator: Off
-
Cause
The printer is searching for a wireless connection.
Solution
The Wireless status light blinks slowly when attempting to connect to the wireless router or access point. Wait a few minutes, and then check the light again.
Issue: The Wireless status light blinks slowly and the Wireless Strength exclamation point is on
In this error condition, the following control panel light pattern displays:
-
Power light: On
-
Wireless status light: Blinking slowly
-
Wireless Direct status light: On or off
-
Attention light: Off
-
Tri-color ink cartridge light: Off
-
Black ink cartridge light: Off
-
Wireless Strength indicator: On
-
Number of Copies display: On
-
Media Error indicator: Off

-
Cause
The printer cannot connect to your network.
Solutions
Solution one: Wait for the printer to establish a connection
The Wireless status light blinks slowly when attempting to connect to the wireless router or access point. Wait a few minutes, and then check the light again.
-
If these steps resolved the issue, you do not need to continue troubleshooting.
-
If the issue persists, continue to the next solution.
Solution two: Check for issues with the wireless network
The following factors can cause the printer to lose the wireless connection:
-
The network connection is no longer active, or has low signal strength.
-
The printer goes into sleep mode or standby mode.
-
The printer is either too far away from the wireless router, or too close to it. The recommended distance between the printer and the router is 1.0 meter to 1.5 meters (3 ft to 5 ft).
-
A firewall prevents the printer from accessing the computer and wireless network.
-
A nearby device that emits radio signals (such as a microwave or cordless telephone) might interfere with the wireless connection.
-
A virtual private network (VPN) prevents the printer from accessing the computer and wireless network.
-
If these steps resolved the issue, you do not need to continue troubleshooting.
-
If the issue persists, continue to the next solution.
Solution three: Connect the printer to your network
Issue: The Wireless status light and the Wireless Strength indicator are blinking fast
In this error condition, the following control panel light pattern displays:
-
Power light: On
-
Wireless status light: Blinking fast
-
Wireless Direct status light: On or off
-
Attention light: Off
-
Tri-color cartridge light: Off
-
Black cartridge light: Off
-
Wireless Strength indicator: Blinking fast
-
Number of Copies display: On
-
Media Error indicator: Off

-
Cause
-
A Wi-Fi Protected Setup (WPS) of the printer to the wireless network failed
-
The printer cannot not find a compatible WPS wireless router to connect to
-
There is more than one router or access point on the network
note:
HP recommends only one router or access point for the printer's wireless setup.
-
Solutions
Follow these solutions in the order presented to try connecting the printer to the wireless network using Wi-Fi Protected Setup (WPS), or connect to the network by installing the software.
Solution one: Turn off, and then turn on wireless to clear the error
Follow these steps to turn off, and then turn on wireless.
-
On the printer control panel, press the Wireless button
 . The blue Wireless light turns off.
 -
On the printer control panel, press the Wireless button
. The blue Wireless light turns on.
-
If these steps resolved the issue, you do not need to continue troubleshooting.
-
If the issue persists, continue to the next solution.
Solution two: Try the WPS connection again
Use one of the following methods to connect the printer to your WPS-enabled wireless network.
note:If your router does not support WPS connections, continue to the next solution to connect the printer during a software installation.
Method one: Push button
-
On the printer control panel, press and hold the Wireless button
for 3 seconds. The Wireless status light starts blinking. -
Press the WPS button on the router. The printer automatically finds the wireless network and configures the connection.
note:
The printer starts a timer that allows about two minutes to press the WPS button on the wireless router.
-
If these steps resolved the issue, you do not need to continue troubleshooting.
-
If the issue persists, continue to the next solution.
Method two: PIN
-
On the printer control panel, press the Wireless button
and the Start Copy Black button  at the same time. A network configuration page prints. At the top of the network configuration page is the WPS PIN.
 -
Press and hold the Wireless button
for 3 seconds. The Wireless status light starts blinking. -
Open the configuration utility or software for the wireless router or wireless access point, and then enter the WPS PIN.
note:
For more information about using the configuration utility, see the documentation provided with the router or wireless access point.
-
If these steps resolved the issue, you do not need to continue troubleshooting.
-
If the issue persists, continue to the next solution.
Solution three: Connect to the network by installing the printer software
You can connect the printer to the wireless network during a full feature HP printer software installation. Follow these steps to install the software.
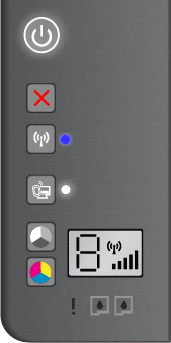
Issue: The Wireless status light and the Wireless Strength light are on
In this normal condition, the following control panel light pattern displays:
-
Power light: On
-
Wireless status light: On
-
Wireless Direct status light: On or off
-
Attention light: Off
-
Tri-color ink cartridge light: Off
-
Black ink cartridge light: Off
-
Wireless Strength indicator: On
-
Number of Copies display: On
-
Media Error indicator: Off

-
Cause
The printer is ready to print wirelessly.
Solution
This is a normal condition. No action is necessary.
Issue: The Attention light is blinking
In this error condition, the following control panel light pattern displays:
-
Power light: On
-
Wireless status light: On or off
-
Wireless Direct status light: On or off
-
Attention light: Blinking
-
Tri-color ink cartridge light: Off
-
Black ink cartridge light: Off
-
Wireless Strength indicator: On or off
-
Number of Copies display: On
-
Media Error indicator: Off
-
Causes
The output tray is closed or a scanning error has occurred.
Solutions
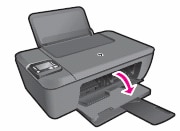
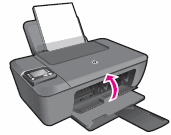
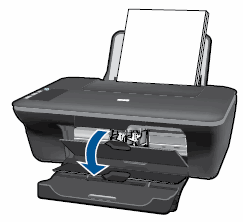
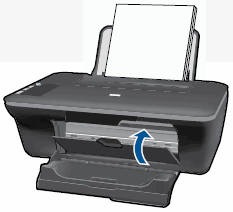
Solution one: Open the output tray
-
Lower the output tray.

-
Pull out the tray extender.

-
Check the printer control panel for blinking lights.
-
If these steps resolved the issue, you do not need to continue troubleshooting.
-
If the issue persists, continue to the next solution.
Solution two: Resolve a scanning error
Follow these steps to resolve a scanning error. If you were not scanning when the error occurred, continue to Service the printer at the end of this document.
note:The printer still prints even if the scan feature is unavailable.
Step one: Turn the printer off, and then on again
-
Press the Power button to turn off the printer.
-
Wait at least 15 seconds.
-
Press the Power button to turn on the printer.
-
Check the lights on the control panel to make sure that they are no longer blinking.
-
Attempt to scan the item again.
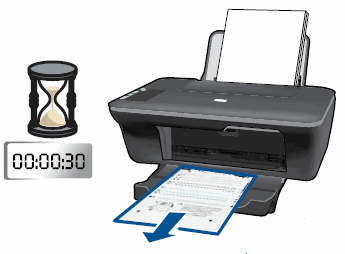
Step two: Print a Printer Status Report
Follow these steps to print a test page.
-
Load clean, white U.S. Letter or A4 paper in the input tray, if necessary.
-
Press and hold the Power button. While holding down the Power button, press and hold the Cancel button. Hold them both down for 2 or 3 seconds.
The test page prints.
-
Power button
-
Cancel button
-
If these steps resolved the issue, and the test page prints, there is no need to continue troubleshooting. Reconnect the USB cable, and then try to scan again.
Issue: The Attention light and both ink cartridge lights are blinking
In this error condition, the following control panel light pattern displays:
-
Power light: On
-
Wireless status light: On or off
-
Wireless Direct status light: On or off
-
Attention light: Blinking
-
Tri-color ink cartridge light: Blinking
-
Black ink cartridge light: Blinking
-
Wireless Strength indicator: On or off
-
Number of Copies display: On
-
Media Error indicator: Off

-
Causes
The ink cartridge access door is open, or there is a carriage jam.
Solutions
Solution one: Close the ink cartridge access door
-
Close the ink cartridge access door.

-
Check the printer control panel for the blinking lights.
-
If these steps resolved the issue, you do not need to continue troubleshooting.
-
If the issue persists, continue to the next solution.
Solution two: Reset the printer
Follow these steps to restart the printer, and then try to print a test page.
Step one: Reset the printer
Follow these steps to reset the printer.
-
With the printer turned on, disconnect the power cord from the rear of the printer.
-
Unplug the power cord from the wall outlet.
-
Wait at least 15 seconds.
-
Plug the power cord back into the wall outlet.
-
Reconnect the power cord to the printer.
-
Turn the printer on.
Step two: Print a test page
Follow these steps to print a test page to make sure that the hardware functions correctly.
Follow these steps to print a test page.
-
Load clean, white U.S. Letter or A4 paper in the input tray, if necessary.
-
Press and hold the Power button. While holding down the Power button, press and hold the Cancel button. Hold them both down for 2 or 3 seconds.
The test page prints.
-
Power button
-
Cancel button
-
-
If these steps resolved the issue, and the test page prints, there is no need to continue troubleshooting.
-
If the issue persists, continue with the next solution.
-
If the test page does not print, continue with the next solution.
Solution three: Clear any jammed paper
A paper jam can cause the carriage to stall. Follow these steps to clear any jammed paper.
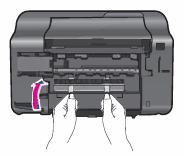
Step one: Clear any jammed paper from the input tray
Follow these steps to clear any jammed paper from the input tray.
-
Pull the paper gently out of theinput tray to remove the paper jam.
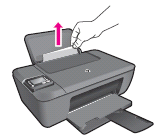
-
Gently remove any jammed paper and bits of torn paper from the tray. To avoid tearing any whole sheets of paper, pull the paper with both hands.
note:
Use a flashlight to thoroughly check for torn pieces of paper that might remain inside the tray. If any torn pieces of paper remain inside the printer, more jams are likely to occur.
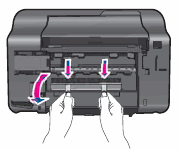
Step two: Clear any jammed paper from the output tray
Follow these steps to clear the jam from the output tray.
-
Locate the output tray in the front of the printer.
-
Gently remove any jammed paper and bits of torn paper from the tray. To avoid tearing any whole sheets of paper, pull the paper with both hands.
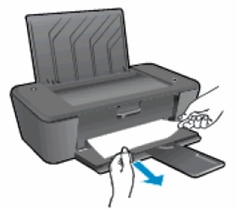
note:
Use a flashlight to thoroughly check for torn pieces of paper that might remain inside the tray. If any torn pieces of paper remain inside the printer, more jams are likely to occur.
Step three: Remove any loose paper, debris, or foreign objects from the trays
-
Turn off the printer.
-
Disconnect the USB cable from the rear of the printer.
-
Disconnect the power cord from the rear of the printer.
warning:
You must disconnect the power cord before you reach inside the HP printer to avoid risk of injuries or electric shock.
-
Remove any loose sheets of paper from the input tray.
-
Tilt the printer on its back, and then use your fingers to move the pick mechanism from inside the input tray.
Debris or foreign objects might fall out of the printer.
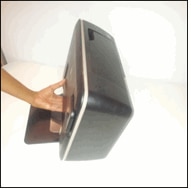
-
Return the printer to its normal position.
Step four: Clear any jammed paper from the ink cartridge access area
If you cannot remove the jam from the base or inside the printer, follow these steps to remove the paper jam from the front.
-
Press the Power button to turn off the printer if it is not off already.
-
Disconnect the power cord from the rear of the printer if it is not disconnected already.
warning:
You must disconnect the power cord before reaching inside the HP printer to avoid risk of injuries or electric shock.
-
Open the ink cartridge access door.

-
Gently remove any jammed paper from inside the printer.

-
Close the ink cartridge access door.
Step five: Clear any jammed paper from underneath the printer
Use the following steps to check for and remove jammed paper from the base of the HP printer.
-
Disconnect the USB cable from the rear of the printer.
-
Turn the printer so that you can access its underside (base).
caution:
Before turning the printer, use your hand to secure the scanner lid.
-
Press in the tabs on either side of the cleanout door to open it.
-
Gently remove any jammed paper from inside the printer.
note:
Use a flashlight to thoroughly check for torn pieces of paper that might remain inside the printer. If any torn pieces of paper remain inside the printer, more jams are likely to occur.

-
Reattach the cleanout door. Gently push the door forward until it snaps into place.
-
Turn the printer over to its normal position.
-
Open the ink cartridge access door, and then look inside the printer for any loose objects that might have shifted when the printer was turned over. Remove any loose objects found.
-
Close the ink cartridge access door.
-
Reconnect the power cord to the rear of the printer.
-
Press the Power button to turn on the printer.
Step six: Print a test page
Print a test page to make sure that the hardware functions correctly.
How to print a test page
Print a test page to make sure that the hardware functions correctly.
Follow these steps to print a test page.
-
Load clean, white U.S. Letter or A4 paper in the input tray, if necessary.
-
Press and hold the Power button. While holding down the Power button, press and hold the Cancel button. Hold them both down for 2 or 3 seconds.
The test page prints.
-
Power button
-
Cancel button
-
-
If these steps resolved the issue, and the test page prints, there is no need to continue troubleshooting. Reconnect the USB cable, and then try to print again.
-
If the issue persists, continue with the next solution.
-
If the test page does not print, continue with the next solution.
Solution four: Make sure that the carriage moves freely
Follow these steps to make sure that the carriage can move freely.
Step one: Check the carriage path for obstructions
Follow these steps to check the carriage path for obstructions.
-
Turn on the printer, if it is not already on.
-
Open the ink cartridge access door.
-
Wait until the carriage is idle and silent before you continue.
-
With the printer turned on, disconnect the power cord from the rear of the printer.
warning:
You must unplug the power cord to move the carriage by hand and reset the paper feed mechanism without the risk of electrical shock.
-
Check for any paper or objects that might be restricting the carriage, and then remove any paper or objects that you find.
caution:
If the paper tears when you remove it from the rollers, check the rollers and wheels for torn pieces of paper that might remain inside the printer. If pieces of paper remain in the printer, more paper jams can occur.
-
Reach inside the printer through the ink cartridge access door, and then manually move the carriage.
-
If the carriage is stuck on the right side of the printer, move the carriage to the left side of the printer.
-
If the carriage is stuck on the left side of the printer, move the carriage to the right side of the printer.
-
If the carriage is stuck in the middle of the printer, move the carriage to the right side of the printer.
-
-
Remove any loose paper or obstructions found.
-
Make sure the carriage can move freely across the width of the printer. Firmly push the carriage to the left side of the printer, and then to the right side.
-
Open the ink cartridge access door.
-
Reconnect the power cord to the rear of the printer, and then turn on the printer.
Step two: Print a test page
Print a test page to make sure that the hardware functions correctly.
How to print a test page
Follow these steps to print a test page.
-
Load clean, white U.S. Letter or A4 paper in the input tray, if necessary.
-
Press and hold the Power button. While holding down the Power button, press and hold the Cancel button. Hold them both down for 2 or 3 seconds.
The test page prints.
-
Power button
-
Cancel button
-
-
If these steps resolved the issue, and the test page prints, there is no need to continue troubleshooting.
-
If the issue persists, continue with the next solution.
-
If the test page does not print, continue with the next solution.
Solution five: Remove and reinsert the ink cartridges
Incorrect placement or installation of the ink cartridges can cause the printer to indicate a carriage jam error. Follow these steps to remove and then reinsert the ink cartridges.
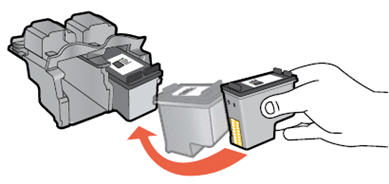
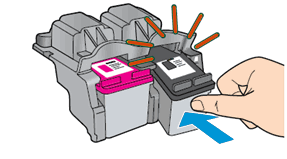
Step one: Remove and reinsert the ink cartridges
-
Press the Power button
 to turn on the printer, if it is not already turned on. Wait until the printer is idle and silent before continuing.
 -
Open the ink cartridge access door. The carriage moves to the center of the printer. Wait until the carriage is idle and silent before continuing.
-
Press down on the ink cartridge to release it, and then pull the ink cartridge out to remove it from its slot.

caution:
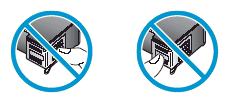
Do not touch the copper-colored contacts or the ink nozzles. Touching these parts can result in clogs, ink failure, and bad electrical connections.
-
Check for obstructions under and around the carriage. Clear any obstructions you find. You might need a flashlight to illuminate areas for proper viewing.
-
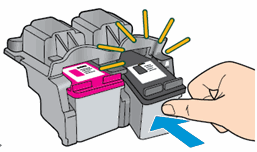
Hold the ink cartridge by its sides with the nozzles toward the printer, and then insert the ink cartridge into its slot. Make sure that the icon on the ink cartridge matches the icon on the slot.
-
The tri-color ink cartridge goes in the slot on the left.
-
The black ink cartridge goes in the slot on the right.

-
-
Push the ink cartridge forward into its slot until it snaps into place.
-
Close the ink cartridge access door.
Step two: Print a test page
Print a test page to make sure that the hardware functions correctly.
How to print a test page
Follow these steps to print a test page.
-
Load clean, white U.S. Letter or A4 paper in the input tray, if necessary.
-
Press and hold the Power button. While holding down the Power button, press and hold the Cancel button. Hold them both down for 2 or 3 seconds.
The test page prints.
-
Power button
-
Cancel button
-
-
If these steps resolved the issue, and the test page prints, there is no need to continue troubleshooting.
-
If the issue persists, continue with the next solution.
-
If the test page does not print, continue with the next solution.
Solution six: Plug the printer directly into a wall outlet
Follow these steps to plug the printer directly into a wall outlet and print a test page report.
Step one: Plug the printer directly into a wall outlet
-
Disconnect the power cord from the rear of the printer.
-
Unplug the power cord from any power strips or surge suppressors.
-
Plug the power cord directly into an electrical outlet.
-
Reconnect the power cord to the rear of the printer.
-
Turn on the printer.
Step two: Print a test page
Print a test page to make sure that the hardware functions correctly.
How to print a test page
Follow these steps to print a test page.
-
Load clean, white U.S. Letter or A4 paper in the input tray, if necessary.
-
Press and hold the Power button. While holding down the Power button, press and hold the Cancel button. Hold them both down for 2 or 3 seconds.
The test page prints.
-
Power button
-
Cancel button
-
-
If these steps resolved the issue, and the test page prints, there is no need to continue troubleshooting. Reconnect the USB cable, and then try to print again.
-
If the test page prints successfully, but you continue to experience an issue with your printer, then the issue is not related to the hardware.
-
Experiencing another issue?
If your printer prints a test page and there is still an issue with your printer, go to HP Customer Support, type your printer model, and then browse for the appropriate support document to troubleshoot the issue.
-
-
If the printer does not print a test page, there is an issue with the printer hardware. Continue to the next step or solution.
Solution seven: Service the printer
If you have completed all the previous steps and the issue persists, continue to the Service the printer section at the end of this document.
Issue: All the lights are blinking
In this error condition, all of the control panel lights are blinking:
-
Power light: Blinking
-
Wireless status light: Blinking
-
Wireless Direct status light: Blinking
-
Attention light: Blinking
-
Tri-color ink cartridge light: Blinking
-
Black ink cartridge light: Blinking
-
Wireless Strength indicator: Blinking
-
Number of Copies display: Blinking E
-
Media Error indicator: ! and Paper icon (
 ) blinking
-
Cause
The printer is in an error state.
Solutions
Solution one: Reset the printer
-
With the printer turned on, disconnect the power cord from the rear of the printer.
-
Unplug the power cord from the wall outlet.
-
Wait at least 15 seconds.
-
Plug the power cord back into the wall outlet.
-
Reconnect the power cord to the printer.
-
Turn the printer on.
-
If these steps resolved the issue, you do not need to continue troubleshooting.
-
If the issue persists, continue to the next solution.
Solution two: Plug the printer directly into an electrical outlet
Plug the product directly into an electrical outlet to make sure that the power source functions correctly.
-
Disconnect the power cord from the rear of the product.
-
Unplug the power cord from any power strips or surge suppressors.
-
Plug the power cord directly into an electrical outlet.
-
Reconnect the power cord to the rear of the product.
-
Press the Power button (
) to turn on the product.
-
Try the task again.
If the issue persists, try a different electrical outlet.
-
If these steps resolved the issue, you do not need to continue troubleshooting.
-
If the issue persists, continue to the next solution.
Solution three: Service the printer
If you have completed all the previous steps and the issue persists, continue to the Service the printer section at the end of this document.
Issue: One or both ink cartridge lights are blinking
In this error condition, the following control panel light pattern displays:
-
Power light: On
-
Wireless status light: On or off
-
Wireless Direct status light: On or off
-
Attention light: Off
-
Tri-color ink cartridge light: Blinking or off
-
Black ink cartridge light: Blinking or off
-
Wireless Strength indicator: On or off
-
Number of Copies display: On
-
Media Error indicator: Off
| The black ink cartridge light blinks | The tri-color ink cartridge light blinks | Both ink cartridge lights blink | ||
| | | | ||

-
Causes
-
One or both ink cartridges are not compatible with the printer.
-
One or both ink cartridges still have the protective tape on the nozzles.
-
One or both ink cartridges are defective.
-
A problem has occurred with one or both ink cartridges.
-
Solutions
Solution one: Check the ink cartridge compatibility
Follow these steps to make sure that the ink cartridges are compatible with your printer.
Purchase replacement cartridges and other supplies from the HP Store or local retailers.
-
If the ink cartridges are compatible, continue with the solutions in this document.
Solution two: Remove, inspect, and then reseat the ink cartridges
Follow these steps to make sure that the cartridges are inserted correctly.
note:HP cannot guarantee the quality of remanufactured or refilled ink cartridges. Use genuine HP ink cartridges for good print quality.
-
If the printer is off, press the Power button to turn on the printer.
-
Open the ink cartridge access door. The carriage moves to the center of the printer. Wait until the carriage is idle and silent before continuing.
-
Press down on the ink cartridge to release it, and then pull the ink cartridge out to remove it from its slot.
caution:
Do not touch the copper-colored contacts or the ink nozzles. Touching these parts can result in clogs, ink failure, and bad electrical connections.
-
Remove any protective tape that still might be on the nozzles.
caution:
Do not try to remove the copper electrical strip.
-
Hold the ink cartridge by its sides with the nozzles toward the printer, and then insert the ink cartridge into its slot. Make sure that the ink cartridge is inserted in the correct slot.
-
The tri-color ink cartridge
 goes in the slot on the left.
 -
The black ink cartridge
 goes in the slot on the right.
-
-
Push the ink cartridge forward into its slot until it snaps into place.
-
Repeat these steps to replace the other ink cartridge, if necessary.
-
Close the ink cartridge access door.
-
If these steps resolved the issue, you do not need to continue troubleshooting.
-
If the issue persists, continue to the next solution.
Solution three: Clean the ink cartridge contacts
Follow these steps to clean the contacts on the ink cartridge and in the ink cartridge slot.
caution:Clean the ink cartridges one at a time. Do not leave an ink cartridge outside the printer for more than 30 minutes.
-
Gather the following materials:
-
Dry foam-rubber swabs, lint-free cloth, or any soft material that does not come apart or leave fibers (coffee filters work well)
-
Distilled, filtered, or bottled water (tap water might contain contaminants that can damage the ink cartridges)
caution:
Do not use platen cleaners or alcohol to clean the ink cartridge contacts. These can damage the ink cartridge or the printer.
-
-
Press the Power button to turn on the printer.
-
Open the ink cartridge access door. The carriage moves to the center of the printer. Wait until the carriage is idle and silent before continuing.
-
Disconnect the power cord from the rear of the printer.
-
Press down on the ink cartridge to release it, and then pull the ink cartridge out to remove it from its slot.
caution:
Do not remove both ink cartridges at the same time. Remove and clean each ink cartridge one at a time. Do not leave an ink cartridge outside the printer for more than 30 minutes.
-
Hold the ink cartridge by its sides.
-
Inspect the contacts for ink and debris buildup.
-
Wipe the contacts with a dry swab or other lint-free material until no debris remains on them.
caution:
Be careful to wipe only the contacts. Do not smear any ink or debris elsewhere on the ink cartridge.
-
Dip a clean foam-rubber swab or lint-free cloth into distilled water, and then squeeze any excess water from it.
-
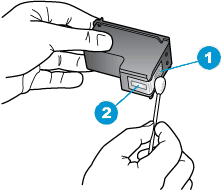
Clean only the copper-colored contacts, and then allow the ink cartridge to dry for approximately 10 minutes.
-
Copper-colored contacts
-
Ink nozzles (do not clean)
-
-
Lightly moisten another cotton swab with distilled water, and then squeeze any excess water from the swab.
-
Use the swab to clean the electrical contacts in the carriage, located inside the printer.
-
Clean the contacts in the carriage.
-
Either let the ink cartridge sit for 10 minutes to allow the cleaned area to dry, or use a new swab to dry it.
note:
Make sure that the ink cartridge is not left out of the printer for more than 30 minutes.
-
Hold the ink cartridge by its sides with the nozzles toward the printer, and then insert the ink cartridge into its slot. Make sure that the ink cartridge is inserted in the correct slot.
-
Push the ink cartridge forward into its slot until it snaps into place.
-
Repeat these steps to clean and then reinsert the other ink cartridges.
-
Close the ink cartridge access door.
-
Reconnect the power cord to the rear of the printer.
-
Press the Power button to turn on the printer if it does not turn on automatically.
-
If these steps resolved the issue, you do not need to continue troubleshooting.
-
If the issue persists, continue to the next solution.
Solution four: Reset the printer
-
With the printer turned on, disconnect the power cord from the rear of the printer.
-
Unplug the power cord from the wall outlet.
-
Wait at least 15 seconds.
-
Plug the power cord back into the wall outlet.
-
Reconnect the power cord to the printer.
-
Turn the printer on.
-
If these steps resolved the issue, you do not need to continue troubleshooting.
-
If the issue persists, continue to the next solution.
Solution five: Remove, and then reinsert the ink cartridges again
Removing and reinserting the ink cartridges again can help resolve the issue. Repeat the steps that you performed earlier in this document to remove, and then reinsert the ink cartridges.
-
If these steps resolved the issue, you do not need to continue troubleshooting.
-
If the issue persists, continue to the next solution.
Solution six: Clean the ink cartridge contacts again
Cleaning the ink cartridge contacts again can help resolve the issue. Repeat the steps that you performed earlier in this document to clean the ink cartridge contacts.
-
If these steps resolved the issue, you do not need to continue troubleshooting.
-
If the issue persists, continue to the next solution.
Solution seven: Replace the ink cartridge
Follow these steps to replace the ink cartridge or ink cartridges indicated by the blinking light.
If you have a defective cartridge or printhead, it might be under warranty. To check the warranty on your ink or toner supplies, go to Printer and Page Yield Overview, and then review the limited warranty information for your supplies.
Step one: Replace the ink cartridge
-
Press the Power button to turn on the printer, if it is not already turned on.
-
Load plain white paper into the input tray.
-
Open the ink cartridge access door. The carriage moves to the center of the printer. Wait until the printer is idle and silent before continuing.
-
Lightly press down on the ink cartridge to release it, and then pull the ink cartridge out of its slot.
-
Remove the new ink cartridge from its packaging, and then pull the orange tab to remove the plastic tape.
caution:
Do not touch the copper-colored contacts or the ink nozzles. Touching these parts can result in clogs, ink failure, and bad electrical connections.
-
Hold the ink cartridge by its sides with the nozzles toward the printer, and then insert the ink cartridge into its slot. Make sure that the ink cartridge is inserted in the correct slot.
-
The tri-color ink cartridge
goes in the slot on the left. -
The black ink cartridge
goes in the slot on the right.
-
-
Push the ink cartridge forward into its slot until it snaps into place.
-
Repeat these steps to replace the other ink cartridge, if necessary.
-
Close the ink cartridge access door.
-
Follow any prompts on the screen.
-
Wait about 30 seconds for the alignment page to automatically print.
note:
The printer prints an alignment page automatically only when a new ink cartridge has been installed.
Step two: Align the ink cartridges
-
Lift the scanner lid.
-
Place the alignment page with the print side down on the right-front corner of the scanner glass. See the engraved guide next to the scanner glass for help loading the alignment page.
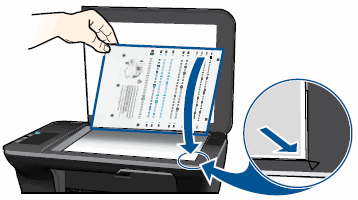
-
Close the scanner lid.
-
Press the Start Copy Black button
 or the Start Copy Color button
  on the front panel of the printer. The printer aligns the ink cartridges.
Solution eight: Service the printer
If you have completed all the previous steps and the issue persists, continue to the Service the printer section at the end of this document.
Issue: One or both cartridge lights are on
In this error condition, the following control panel light pattern displays:
-
Power light: On
-
Wireless status light: On
-
Wireless Direct status light: On or off
-
Attention light: Off
-
Tri-color ink cartridge light: On or off
-
Black ink cartridge light: On or off
-
Wireless Strength indicator: On or off
-
Number of Copies display: On
-
Media Error indicator: Off
| Black ink cartridge light is on | Tri-color ink cartridge light is on | Both ink cartridge lights are on | ||
| | | | ||


-
Causes
-
One or both ink cartridges are not compatible with the printer.
-
One or both ink cartridges still have the protective tape on the nozzles.
-
The ink level is low in one or both ink cartridges.
-
Solutions
Solution one: Check the ink cartridge compatibility
Follow these steps to make sure that the ink cartridges are compatible with your printer.
Purchase replacement cartridges and other supplies from the HP Store or local retailers.
-
If the ink cartridges are compatible, continue to the next solution in this document.
Solution two: Remove, inspect, and then reseat the ink cartridges
Follow these steps to make sure that the ink cartridges are inserted correctly.
note:HP cannot guarantee the quality of remanufactured or refilled ink cartridges. Use genuine HP ink cartridges for good print quality.
-
If the printer is off, press the Power button to turn on the printer.
-
Open the ink cartridge access door. The carriage moves to the center of the printer. Wait until the carriage is idle and silent before continuing.
-
Press down on the ink cartridge to release it, and then pull the ink cartridge out to remove it from its slot.
caution:
Do not touch the copper-colored contacts or the ink nozzles. Touching these parts can result in clogs, ink failure, and bad electrical connections.
-
Remove any protective tape that still might be on the nozzles.
caution:
Do not try to remove the copper electrical strip.
-
Hold the ink cartridge by its sides with the nozzles toward the printer, and then insert the ink cartridge into its slot. Make sure that the ink cartridge is inserted in the correct slot.
-
The tri-color ink cartridge
goes in the slot on the left. -
The black ink cartridge
goes in the slot on the right.
-
-
Push the ink cartridge forward into its slot until it snaps into place.
-
Repeat these steps to replace the other ink cartridge, if necessary.
-
Close the ink cartridge access door.
Solution three: Replace low or empty ink cartridges
Follow these steps to check the ink levels.
note:Ink level warnings and indicators provide estimates for planning purposes only. When an indicator shows low ink levels, consider having a replacement ink cartridge available to avoid possible printing delays. You do not need to replace ink cartridges until print quality becomes unacceptable.
Step one: Replace the ink cartridge
Purchase replacement cartridges and other supplies from the HP Store or local retailers.
-
Press the Power button to turn on the printer, if it is not already turned on.
-
Load plain white paper into the input tray.
-
Open the ink cartridge access door. The carriage moves to the center of the printer. Wait until the printer is idle and silent before continuing.
-
Lightly press down on the ink cartridge to release it, and then pull the ink cartridge out of its slot.
-
Remove the new ink cartridge from its packaging, and then pull the orange tab to remove the plastic tape.
caution:
Do not touch the copper-colored contacts or the ink nozzles. Touching these parts can result in clogs, ink failure, and bad electrical connections.
-
Hold the ink cartridge by its sides with the nozzles toward the printer, and then insert the ink cartridge into its slot. Make sure that the ink cartridge is inserted in the correct slot.
-
The tri-color ink cartridge
goes in the slot on the left. -
The black ink cartridge
goes in the slot on the right.
-
-
Push the ink cartridge forward into its slot until it snaps into place.
-
Repeat these steps to replace the other ink cartridge, if necessary.
-
Close the ink cartridge access door.
-
Follow any prompts on the screen.
-
Wait about 30 seconds for the alignment page to automatically print.
note:
The printer prints an alignment page automatically only when a new ink cartridge has been installed.
Step three: Align the cartridges
-
Lift the scanner lid.
-
Place the alignment page with the print side down on the right-front corner of the scanner glass. See the engraved guide next to the scanner glass for help loading the alignment page.
-
Close the scanner lid.
-
Press the Start Copy Black button
or the Start Copy Color button on the front panel of the printer. The printer aligns the ink cartridges.
-
If these steps resolved the issue, you do not need to continue troubleshooting.
-
If the issue persists, continue to the next solution.
Solution three: Service the printer
If you have completed all the previous steps and the issue persists, continue to the Service the printer section at the end of this document.
Issue: The Power light is blinking
In this normal condition, the following control panel light pattern displays:
-
Power light: Blinking
-
Wireless status light: On or off
-
Wireless Direct status light: On or off
-
Attention light: Off
-
Tri-color ink cartridge light: Off
-
Black ink cartridge light: Off
-
Wireless Strength indicator: On or off
-
Number of Copies display: On
-
Media Error indicator: Off

-
Cause
The printer is busy processing a print, scan, copy, or maintenance job.
Solutions
Solution one: Wait for the job to finish
Wait for the current task to finish before starting another task.
-
If these steps resolved the issue, you do not need to continue troubleshooting.
-
If the issue persists, continue to the next solution.
Solution two: Reset the printer
Follow these steps to reset the printer.
Step one: Reset the printer
-
With the printer turned on, disconnect the power cord from the rear of the printer.
-
Unplug the power cord from the wall outlet.
-
Wait at least 15 seconds.
-
Plug the power cord back into the wall outlet.
-
Reconnect the power cord to the printer.
-
Turn the printer on.
Step two: Print a test page
Printing a test page verifies if the hardware functions correctly. Follow these steps to print a test page.
Follow these steps to print a test page.
-
Load clean, white U.S. Letter or A4 paper in the input tray, if necessary.
-
Press and hold the Power button. While holding down the Power button, press and hold the Cancel button. Hold them both down for 2 or 3 seconds.
The test page prints.
-
Power button
-
Cancel button
-
-
If these steps resolved the issue, and the test page prints, there is no need to continue troubleshooting.
-
If the issue persists, continue with the next solution.
-
If the test page does not print, continue with the next solution.
Solution three: Service the printer
If you have completed all the previous steps and the issue persists, continue to the Service the printer section at the end of this document.
Issue: The Power light blinks fast for three seconds, and then returns to on
In this normal condition, the following control panel light pattern displays:
-
Power light: Blinking fast for three seconds, and then on
-
Wireless status light: On or off
-
Wireless Direct status light: On or off
-
Attention light: Off
-
Tri-color ink cartridge light: Off
-
Black ink cartridge light: Off
-
Wireless Strength indicator: On or off
-
Number of Copies display: On
-
Media Error indicator: Off

-
Cause
The printer is busy performing another task.
Solutions
Solution one: Wait for the job to finish
Wait for the current task to finish before starting another task.
-
If these steps resolved the issue, you do not need to continue troubleshooting.
-
If the issue persists, continue to the next solution.
Solution two: Reset the printer
Follow these steps to reset the printer.
Step one: Reset the printer
-
With the printer turned on, disconnect the power cord from the rear of the printer.
-
Unplug the power cord from the wall outlet.
-
Wait at least 15 seconds.
-
Plug the power cord back into the wall outlet.
-
Reconnect the power cord to the printer.
-
Turn the printer on.
Step two: Print a Printer Status Report
Follow these steps to print a test page.
-
Load clean, white U.S. Letter or A4 paper in the input tray, if necessary.
-
Press and hold the Power button. While holding down the Power button, press and hold the Cancel button. Hold them both down for 2 or 3 seconds.
The test page prints.
-
Power button
-
Cancel button
-
-
If these steps resolved the issue, and the test page prints, there is no need to continue troubleshooting.
-
If the issue persists, continue with the next solution.
-
If the test page does not print, continue with the next solution.
Solution three: Service the printer
If you have completed all the previous steps and the issue persists, continue to the Service the printer section at the end of this document.
Issue: The Power light dims and then brightens
In this normal condition, the Power light dims and then brightens again.
-
Power light: Dims and then brightens
-
Wireless status light: On or off
-
Wireless Direct status light: On or off
-
Attention light: Off
-
Tri-color ink cartridge light: Off
-
Black ink cartridge light: Off
-
Wireless Strength indicator: On or off
-
Number of Copies display: On
-
Media Error indicator: Off
-
Cause
The printer is in sleep mode. After the initial setup, the printer enters sleep mode after five minutes of inactivity.
Solution
Press any button on the printer control panel, open the ink cartridge access door, or start a print job from the computer to wake the printer from sleep mode.
Issue: All the lights are off, and the printer does not respond
In this condition, the following control panel light pattern displays:
-
Power light: Off
-
Wireless status light: Off
-
Wireless Direct status light: Off
-
Attention light: Off
-
Tri-color ink cartridge light: Off
-
Black ink cartridge light: Off
-
Wireless Strength indicator: Off
-
Number of Copies display: Off
-
Media Error indicator: Off

-
Cause
The printer is turned off, or there is an issue with the power supply.
Solutions
Solution one: Turn on the printer
Press the Power button to turn on the printer.
-
If these steps resolved the issue, you do not need to continue troubleshooting.
-
If the issue persists, continue to the next solution.
Solution two: Make sure that the printer is plugged in
Follow these steps to make sure that the power cord is connected to the rear of the printer and plugged into an electrical outlet.
-
Check the rear of the printer to make sure that the cord from the power supply is inserted securely into the power connection.
-
Check the power supply to make sure that the power cord is plugged in securely.
-
Check the electrical outlet to make sure that the power cord is plugged in securely.
-
Rear of printer
-
Power supply
-
Electrical outlet

-
-
Press the Power button to turn on the printer.
-
If these steps resolved the issue, you do not need to continue troubleshooting.
-
If the issue persists, continue to the next solution.
Solution three: Plug the printer directly into a wall outlet
If you are using a surge protector, extension cable, or power strip, plug the printer directly into a wall outlet to make sure that the power source functions correctly.
-
Unplug the power cord from any surge protector, extension cable, or power strip.
-
Plug the power cord directly into a wall outlet.
-
Press the Power button to turn on the printer.
Solution four: Make sure that the electrical outlet works
-
Unplug the power cord from the electrical outlet.
-
Plug another appliance into the electrical outlet to make sure that the outlet works.
-
If the electrical outlet does not work, plug the printer into another outlet that does work.
-
If the electrical outlet works, but the printer still does not turn on, continue to the next solution.
Solution five: Make sure that the power supply is compatible with the printer
Follow these steps to make sure that your printer and power supply are compatible.
note:HP recommends that you use the original power supply shipped with your printer.
-
Make sure that the voltage and amperage specifications printed on the power module match the voltage and amperage specifications on the printer.
note:
These specifications are also in the printer user guide or on the HP website. Go to HP Customer Support and search for your printer to find these power specifications.
Voltage and amperage specifications on an external power module
Voltage and amperage requirements on an HP printer

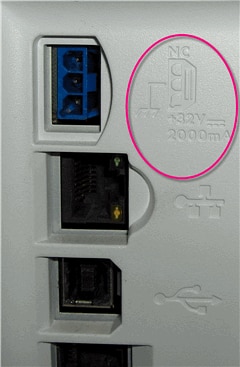
In this example, the voltage (+32 V) and the amperage (2000 mA) from the power supply are compatible with the voltage and amperage specified on the HP printer.
-
If the voltage and amperage specifications between the printer and the power supply are compatible, make sure that the connector on the power cord is the same shape and color as the connector on the HP printer.
warning:
Do not force a power cord into an HP printer that is incompatible with the HP printer (different shape or size).
-
If the power supply is compatible with the printer, but the printer still does not turn on, continue to the next solution.
-
If the power supply is not compatible with the printer, contact HP to replace the power supply with a compatible power cord or power module.
Click Contact Support on this page for more support options.
Solution six: Reset the power module, and then test the power
Follow these steps to reset the power module, and then test the power.
Step one: Reset the power module
The power module has a safety feature inside that protects the printer during a power surge. If you experienced a recent power surge, the power module might need to be reset. Use the following steps to reset the power module.
-
Disconnect the power cord from the rear of the printer.
-
Unplug the power cord from the wall outlet, power strip, or surge protector.
-
If the printer uses a power module with a detachable power cord, disconnect the cord from the power module.
-
Wait 15 seconds.
-
If the printer uses a power module with a detachable power cord, reconnect the power cord to the power module.
-
Reconnect the power cord to the rear of the printer.
-
Plug the power cord directly into a wall outlet. Do not use a power strip or surge protector.
-
Check to see if the power module or the power cord has an indicator light and if it is on.
note:
Not all external modules or cords have an indicator light.

-
Depending on the indicator light status, choose one of the following options:
-
If the power module indicator light was on prior to connecting to the printer but turned off once connected to the printer, continue to Service the printer at the end of this document.
-
If the indicator light is on, continue to the next step.
-
If the indicator light is off, continue to the next step.
-
Step two: Test the power on the printer
Follow these steps to test the power on the printer.
-
Make sure that the power cord is connected to the rear of the printer and directly into a wall outlet.
-
Press and quickly release the Power button to start a Power On/Off cycle. Do not hold the button down.


If you press and hold the Power button too long, the printer might turn on and then off without restarting. If this happens, press and quickly release the Power button again.
-
If these steps resolved the issue, you can stop troubleshooting.
-
If the issue persists, choose one of the following options:
-
If the indicator light on the power module is off, continue to the next solution.
-
If the indicator light on the power module is on and the printer still does not turn on, continue to Service the printer at the end of this document.
-
Solution seven: Test the power with a compatible power cord from a different printer
If you have another available power cord that is compatible with your printer, use the alternate cord to repeat the steps in the solution to Reset the power module and test the power.
-
If these steps resolved the issue, you can stop troubleshooting.
-
If the printer turns on with the alternate power cord, the original power cord caused the issue. Contact HP to replace the power cord.
Click Contact Support on this page for more support options.
Solution eight: Replace the power module
If the indicator light on the power module is off, or if the power module does not have an indicator light, and you have tried all of the preceding solutions, contact HP to replace the power module.
 Important! Do not replace a power module when an indicator light is lit on the module.
Click Contact Support on this page for more support options.
-
If these steps resolved the issue, you do not need to continue troubleshooting.
-
If the issue persists, continue to the next solution.
Solution nine: Service the printer
If you have completed all the previous steps and the issue persists, continue to the Service the printer section at the end of this document.
Service the printer
Service or replace your HP product if the issue persists after completing all the preceding steps.
Go to Contact HP Customer Support to schedule a product repair or replacement. If you are in Asia Pacific, you will be directed to a local service center in your area.
To confirm your warranty status, go to HP Product Warranty Check. Repair fees might apply for out-of-warranty products.
What Number Ink Cartridge for Hp 2540
Source: https://support.hp.com/us-en/document/c03817715
0 Response to "What Number Ink Cartridge for Hp 2540"
Post a Comment